Providing feedback on Red Hat documentation
If you have a suggestion to improve this documentation, or find an error, you can contact technical support at https://access.redhat.com to open a request.
1. About the integration options
Learn about the supported integrations between {IBM HashiCorp} products and Red Hat Ansible Automation Platform, the integration workflows, and migration paths to help determine the best options for your environment.
1.1. Introduction
Users can integrate Terraform and Vault with Ansible Automation Platform to gain consistent configuration, accelerate deployment, and manage complex workflows.
1.1.1. Terraform
The integration of Ansible Automation Platform and Terraform addresses common challenges such as managing disparate automation tools, ensuring consistent configuration across hybrid cloud environments and accelerating deployment cycles. While Terraform excels at Infrastructure as Code (IaC) for provisioning and de-provisioning cloud resources, Ansible Automation Platform is a versatile, all-purpose automation solution ideal for configuration management, application deployment, orchestrating complex IT workflows, and providing ongoing health checks, incident response, patching, and infrastructure optimization.
1.1.2. Vault
Vault lets you centrally store and manage secrets securely. The Ansible Automation Platform certified hashicorp.vault` collection provides fully automated Key/Value V2 (KV2) secret lifecycle management for Vault. You can create, update, and delete secrets through playbooks.
|
Note
|
Although the |
1.2. Integration workflows
Depending on your existing setup, you can integrate these products from Ansible Automation Platform or from Terraform. Migration paths are provided for community users and for migrating from the cloud.terraform collection to hashicorp.teraform.
1.2.1. Ansible-initiated workflow
Ansible automation hub collections allow Ansible Automation Platform users to leverage Terraform’s provisioning capabilities.
hashi.terraform collection
This collection provides API integration between Ansible Automation Platform and Terraform. This solution works natively with Ansible Automation Platform and reduces setup complexity because it doesn’t require a binary installation and includes a default execution environment.
If you are already using the cloud.terraform collection, we recommend migrating to the hashicorp.terraform collection to take advantage of the API capabilities.
cloud.terraform collection
This collection provides CLI integration between Ansible Automation Platform and Terraform. To use this collection, you must install a binary and create an execution environment.
Although this collection is supported, and you can migrate from the Community-edition Terraform to cloud.terraform, we recommend using the hashicorp.terraform collection instead to take advantage of its API capabilities.
hashicorp.vault collection
For new Vault users, the hashicorp.vault collection is included in the supported execution environment from automation hub.
For existing community.hashi_vault users, the hashicorp.vault solution is intended to replace the unsupported community.hashi_vault collection. You can [use the migration path] to keep your existing playbooks.
1.2.2. Terraform-initiated workflow
For existing Terraform users, Terraform can directly call Ansible Automation Platform at the end of provisioning for a more seamless and secure workflow. This enables Terraform users to enhance their immutable infrastructure automation with Ansible Automation Platform Day 2 automation capabilities and manage infrastructure updates and lifecycle events.
2. Integrating from Ansible Automation Platform
Ansible Automation Platform can directly call Terraform for provisioning within comprehensive, end-to-end automation workflows. This allows Ansible Automation Platform users to leverage Terraform’s provisioning capabilities while maintaining Ansible Automation Platform as their primary platform for configuration and lifecycle management.
2.1. Authenticating to hashicorp.terraform
After you install or migrate to hashicorp.terraform`, authentication is configured in the Ansible Automation Platform user interface. An administrator creates a custom credential type to authenticate to Terraform. Then users create credentials (based on the credential type) to use with job templates in Ansible Automation Platform.
2.1.1. Creating a custom credential type
Administrators set up a custom credential type to facilitate authentication between Ansible Automation Platform and Terraform. This preparation helps ensure that credentials are provided automatically to the execution environment, eliminating the need to update playbooks manually.
Additionally, you can configure a custom credential for Vault to leverage the advanced features of both Terraform and Vault with Ansible Automation Platform. For information about using Vault, see Configuring Vault and Ansible.
-
You must have a Terraform API token (TF_TOKEN) set up.
-
Install the certified
hashi.terraformcollection from automation hub. (You need an Ansible subscription to access and download collections on Ansible automation hub.)
-
Log in to Ansible Automation Platform.
-
From the navigation panel, select .
-
Click Create a credential type. The Create Credential Type page opens and displays the Details tab.
-
For the Credential Type, enter a name.
-
In the Input configuration field, enter the following parameters and values:
fields:
   - id: token
   type: string
   label: token
   secret: true
-
In the Injector configuration field, enter the TF token:
env: TF_TOKEN: ‘{{ token }}’ -
To save your configuration, click Create Credential Type again. The new credential type is created.
Creating a credential
2.1.2. Creating a credential
Users must create a credential to use with job templates in Ansible Automation Platform.
Your administrator has created a credential type.
-
Log in to Ansible Automation Platform.
-
From the navigation panel, select , and then select Create credential.
-
From the Credential type list, select the credential type. The fields that display depend on the credential type.
-
In the Token field, enter the Terraform API token.
-
(Optional) Edit the Description field and select the TF organization from the Organization list.
-
Click Save credential. You are ready to use the credential in a job template.
2.2. Integrating using cloud.terraform
When you integrate using the cloud.terraform collection, you must create a credential, build an execution environment, and launch a job template in Ansible Automation Platform.
2.2.1. Creating a credential for cloud.terraform
You can set up credentials directly from the Ansible Automation Platform user interface. The credentials are provided to the execution environment and Ansible Automation Platform reads them from there. This eliminates the need to manually update each playbook.
-
You must have a Terraform API token set up.
-
Install the certified
cloud.terraformcollection from automation hub. (You need an Ansible subscription to access and download collections on Ansible automation hub.)
-
Log in to Ansible Automation Platform.
-
From the navigation panel, select .
-
Click Create a credential type. The Create Credential Type page opens and displays the Details tab.
-
For the Credential Type, enter a name.
-
In the Input configuration field, enter the following YAML parameter and values:
fields:
   - id: token
   type: string
   label: token
   secret: true
-
In the Injector configuration field, enter the environment host name and TF token.
-
For Terraform Enterprise, the hostname is the location where you have deployed TFE:
env: TF_TOKEN_<hostname>: ‘{{ token }}’ -
For HCP Terraform, use:
env:
TF_TOKEN_app_terraform_io:   ‘{{ token }}’
-
-
To save your configuration, click Create Credential Type again. The new credential type is created.
-
To create an instance of your new credential type, select , and select Create credential.
-
From the Credential type drop-down list, select the name of the credential type you created earlier.
-
In the Token field, enter the Terraform API token.
-
(Optional) Edit the Description and select the TF organization from the Organization drop-down list.
-
Click Save credential.
2.2.2. Building an execution environment in Ansible Automation Platform
You must build an execution environment using the automation controller so that Ansible Automation Platform can provide the credentials necessary for using its automation features.
-
You need a pre-existing execution environment with the latest version of
cloud.terraformcollection before you can create it using an automation controller. You cannot use the default execution environment provided by Ansible Automation Platform because the default environment does not include theterraformCLI binary.NoteIf you have migrated from Terraform Community-Edition, you can continue to use your existing execution environment and update it to the latest version of
cloud.terraform. -
Install the
terraformCLI binary in your pre-existing execution environment. See Additional resources below for a link to the binary.
-
From the navigation panel, select .
-
Click Create execution environment.
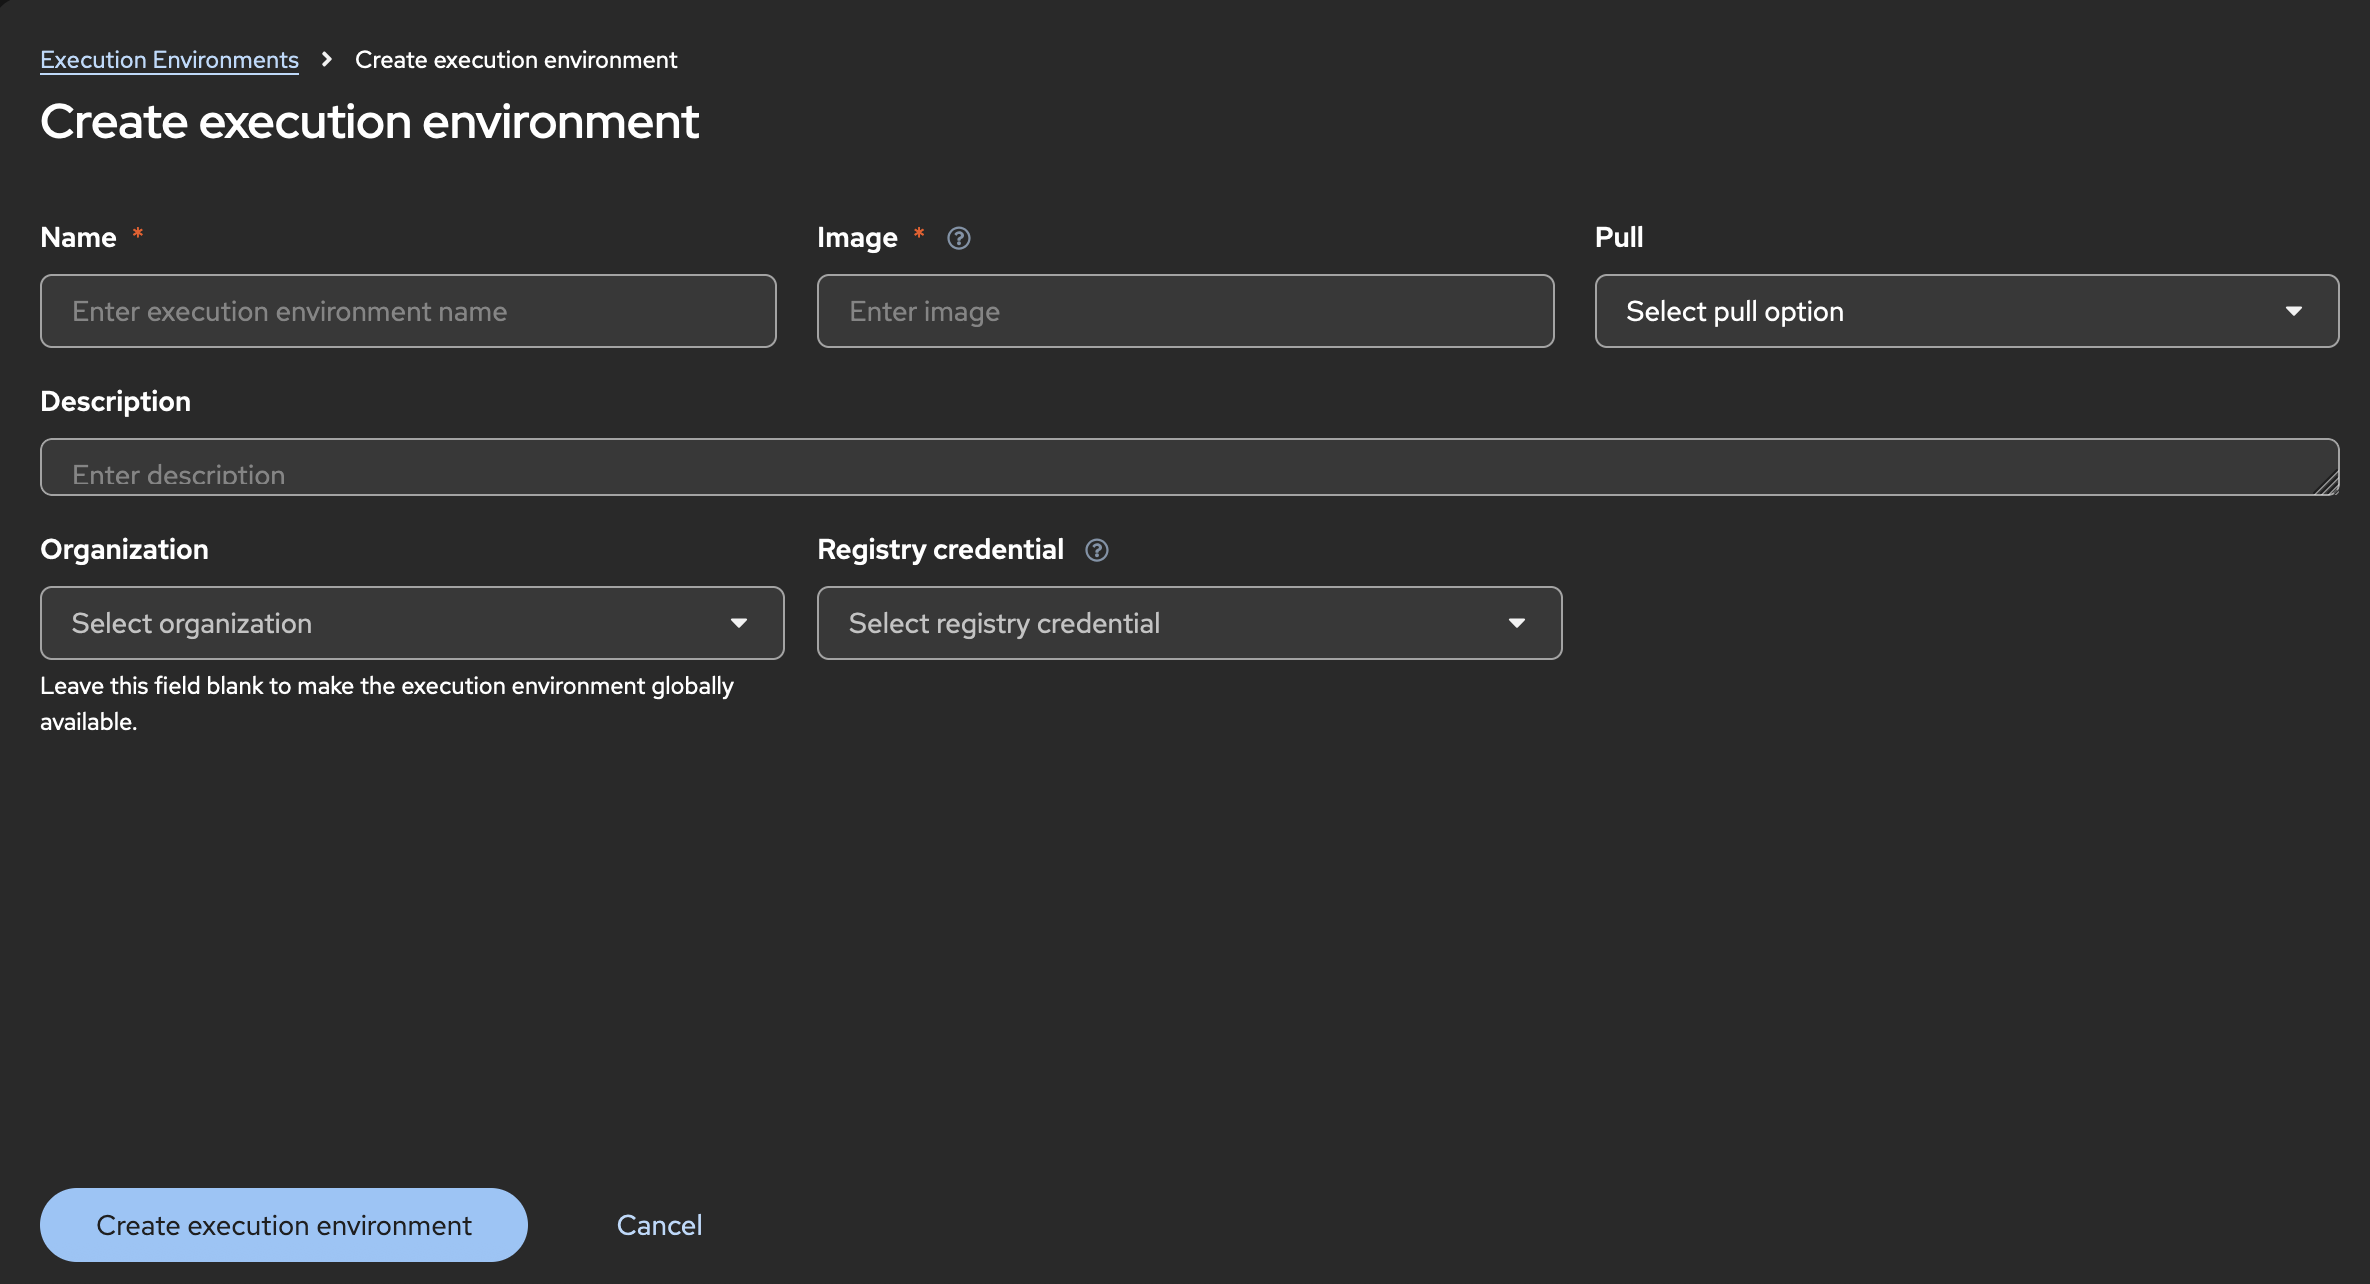
-
For Name, enter a name for your Ansible Automation Platform execution environment.
-
For Image, enter the repository link to the image for your pre-existing execution environment.
-
Click Create execution environment. Your newly added execution environment is ready to be used in a job template.
2.2.3. Creating and launching a job template
Create and launch a job template to complete the integration and use the automation features in Ansible Automation Platform.
-
From the navigation panel, select .
-
Select Create template > Create Job Template.
-
From the Execution Environment list, select the environment you created.
-
From the Credentials drop-down list, select the credentials instance you created previously. If you do not see the credentials, select Browse to see more options in the list.
-
Enter any additional information for the required fields.
-
Click Create job template.
-
Click Launch template.
-
To launch the job, click Next and Finish. The job output shows that the job has run.
To see that the job has run successfully from the Terraform user interface, select Workspaces > Ansible-Content-Integration > Run. The Run list shows the state of the Triggered via CLI job. You can see it go from the Queued to the Plan Finished state.
2.3. Authenticating to hashicorp.vault
After you install or migrate to the hashicorp.vault collection, authentication is configured in the Ansible Automation Platform user interface:
-
An administrator creates a custom credential type to authenticate to Vault.
-
Users create credentials (based on the credential type) to use with job templates in Ansible Automation Platform.
2.3.1. Authentication architecture
The hashicorp.vault collection manages authentication through environment variables and client initialization. This approach enhances security by preventing sensitive credentials from being passed directly as module parameters within playbook tasks. Instead, hashicorp.vault injects credentials into job templates with environment variables, so you get simpler, cleaner task definitions while ensuring that authentication details remain secure.
The following authentication types are supported:
-
appRole authentication: Use either one of the following methods when using appRole authentication:
-
Set the
VAULT_APPROLE_ROLE_IDandVAULT_APPROLE_SECRET_IDenvironment variables. When you use environment variables, you must also create a custom credential type and credentials that will be passed to the job template. -
Directly pass the
role_idandsecret_idparameters to the tasks, for example:- name: Create a secret with AppRole authentication hashicorp.vault.kv2_secret: url: https://vault.example.com:8200 auth_method: approle role_id: "{{ vault_role_id }}" secret_id: "{{ vault_secret_id }}" path: myapp/config data: api_key: secret-api-key
-
-
Token authentication: Set the
VAULT_TOKENenvironment variable.Optionally, you can configure parameters for the token. If parameters are not provided, then the module uses environment variables.
2.3.2. Creating a custom credential type
As an admin, you create a secure credential type in Ansible Automation Platform, which is used to authenticate to Vault.
You can configure role-based (appRole) authentication or allow users to directly provide a token.
Do one of the following:
-
New users: Install the Ansible Automation Platform certified
hashicorp.vaultcollection from Automation hub. -
community.hashi_vaultcollection users: Migrate fromcommunity.hashi_vault. For more information, see Migrating fromcommunity.hashi_vault.
-
Log in to Ansible Automation Platform.
-
From the navigation panel, select .
-
Click Create a credential type. The Create Credential Type page opens.
-
Enter a name and a description in the corresponding fields.
-
If you want to configure token authentication for individual users:
-
For Input configuration, enter:
fields:
 - id: vault_token
   type: string
   label: Hashicorp Vault Token
   secret: true
-
For Injector configuration, enter:
env:
   VAULT_TOKEN: '{{ vault_token }}'
-
-
If you want to configure appRole authentication using
role_idandsecret_id:-
For Input configuration, enter:
fields: - id: vault_approle_role_id type: string label: Hashicorp Vault appRole Role ID secret: true - id: vault_approle_secret_id type: string label: Hashicorp Vault appRole Secret ID secret: true -
For Injector configuration, enter:
env:
    VAULT_APPROLE_ROLE_ID: '{{ vault_approle_role_id }}'
    VAULT_APPROLE_SECRET_ID: '{{ vault_approle_secret_id }}'
-
-
Click Create credential type.
2.3.3. Creating a custom credential
Vault users must create a custom credential to use with job templates in Ansible Automation Platform.
-
Your administrator has created a Vault credential type.
-
Log in to Ansible Automation Platform.
-
From the navigation panel, select , and then select Create credential.
-
Enter a name and a description in the corresponding fields.
-
(Optional) From the Organization list, select an organization.
-
From the Credential type list, select a Vault credential type. The fields that display depend on the credential type.
-
Do one of the following:
-
For the token authentication, add your Vault token and edit any fields as needed.
-
For the appRole authentication method, enter the IDs in the appRole Role ID and appRole Secret ID fields. Edit any other fields as needed.
-
-
Click Save credential. You are ready to use the credential in a job template.
3. Migrating from other versions
To take advantage of the the most advanced features of the integrations between HashiCorp and Ansible Automation Platform, you can migrate from earlier collections or community editions.
3.1. Migrating from cloud.terraform to hashicorp.terraform
If you are using the existing cloud.terraform (CLI-based) collection, you can migrate your existing playbooks to the hashicorp.terraform (API-based) collection. The API solution works natively with Ansible Automation Platform and reduces setup complexity. The main modules for hashicorp.terraform that you must configure are hashicorp.terraform.configuration_version and hashicorp.terraform.run.
3.1.1. Configuring the hashicorp.terraform.configuration_version module
To migrate to the hashicorp.terraform collection, you must configure the hashicorp.terraform.configuration_version module. This module manages configuration versions in Terraform Enterprise or HCP Terraform.
-
Install the Ansible Automation Platform certified
hashicorp.terraformcollection. -
Verify that a valid organization and workspace are correctly set up in Terraform Enterprise or HCP Terraform.
-
Replicate your automation tasks from the
cloud.terraform`modules.Example- name: Create configuration version with auto_queue_runs to false hashicorp.terraform.configuration_version: workspace_id: ws-1234 configuration_files_path: "/usr/home/tf" auto_queue_runs: false tf_validate_certs: true poll_interval: 3 poll_timeout: 15 state: present
-
Configure the following required parameters:
-
workspace_id or workspace + organization: The workspace ID or the workspace name and organization where the configuration version will be created and the file will be uploaded (for state: present). -
configuration_files_path: The path where the required Terraform files will be uploaded to create a configuration version (forstate: present). The module accepts two file types forconfiguration_files_path:-
Directory: Any folder containing Terraform files. The module auto-creates .tar.gz from all contents recursively.
-
.tar.gz Archive: Pre-compressed gzip tarball. The module validates TAR format and GZIP compression.
-
-
configuration_version_id: The configuration version ID that will be archived (state: archived). This action deletes the associated uploaded .tar.gz file. Note the following:-
Only versions that were created using the API or CLI that are uploaded, have no active runs, and are not the current version for any workspace are archived.
-
When the
configuration_version_idis unspecified, Terraform picks the latest approvedconfiguration_version_idin the workspace.
-
-
auto_queue_runs: Determines if Terraform automatically starts a run after the configuration upload (
trueby default) or requires manual initiation (false).
-
-
Set additional optional parameters as needed.
3.1.2. Configuring the hashicorp.terraform.run module
The hashicorp.terraform.run module lets you manage Terraform Enterprise or HCP Terraform runs using create, apply, cancel, discard operations. You can trigger plans or apply operations on specified workspaces with customizable settings.
-
Ensure that a valid Terraform API token is properly configured to authenticate with the Terraform Enterprise or HCP Terraform environment.
-
Verify that a valid organization and workspace are correctly set up in Terraform Enterprise or HCP Terraform.
-
Create a run module.
Example- name: Create a destroy run with auto_apply hashicorp.terraform.run: workspace_id: ws-1234 run_message: "destroy vpc" state: "present" tf_token: <your token> is_destroy: true auto_apply: true target_addrs: - "aws_vpc.vpc1" - "aws_vpc.vpc2" poll: true poll_interval: 10 poll_timeout: 30
-
Configure the following required parameters:
-
workspace_id or workspace + organization: The workspace ID or the workspace name and organization where the configuration version will be created and the file will be uploaded (forstate: present). -
run_id: The unique identifier of the run to apply, cancel, or discard operations. -
tf_token: The Terraform API authentication token. If this value is not set, the environment variableTF_TOKENenvironment variables are used.
-
-
(Optional) Configure the built-in polling options that determine the wait period for Terraform operations to complete:
-
poll: true: (Default) Checks the run status everypoll_intervalseconds (default: 5) until completion orpoll_timeout(default: 25s) is reached, returning the final status. -
poll: false: Returns immediately after initiating the run without waiting.
-
-
Set additional optional parameters as needed.
3.1.3. Migration examples for hashicorp.terraform modules
These before and after examples help users understand how the modules can be configured in a real world environment.
Example 1: Plan Only
-
Before (
cloud.terraform.terraform):
- name: Create a plan file using check mode
  cloud.terraform.terraform:
	force_init: true
	project_path: "/usr/home/tf"
	plan_file: "/usr/home/tf/terraform.tfplan"
	state: present
	check_mode: true
	check_destroy: true
	variables:
		environment: prod
-
After (
hashicorp.terraform.*):-
The
configuration_versionmodule:- name: Create configuration version with auto_queue_runs to false hashicorp.terraform.configuration_version: workspace_id: ws-1234 configuration_files_path: "usr/home/tf_files" auto_queue_runs: false tf_validate_certs: true poll_interval: 5 poll_timeout: 10 state: present
-
The
plan_onlyrun with the run module:- name: Create a plan only run with variables hashicorp.terraform.run: workspace_id: ws-1234 run_message: "plan-only vpc creation" poll: false state: "present" tf_token: "{{ tfc_token }}" plan_only: true variables: - key: "env" value: "production"
-
Example 2: Plan and apply
-
Before (
cloud.terraform.terraform):-
Generate the plan:
- name: Plan and Apply Workflow - Step 1 - Generate Plan
  cloud.terraform.terraform:
	force_init: true
	project_path: "/usr/home/tf"
	plan_file: "/usr/home/tf/workflow.tfplan"
	state: present
	check_mode: true
	variables:
		environment: prod
-
Apply the plan:
- name: Plan and Apply Workflow - Step 2 - Apply Plan
  cloud.terraform.terraform:
	project_path:  "/usr/home/tf"
	plan_file: "/usr/home/tf/workflow.tfplan"
	state: present
-
-
After (
hashicorp.terraform.run):-
The
configuration_versionmodule:- name: Create configuration version with auto_queue_runs to false hashicorp.terraform.configuration_version: workspace_id: ws-1234 configuration_files_path: "usr/home/tf_files" auto_queue_runs: false tf_validate_certs: true poll_interval: 5 poll_timeout: 10 state: present
-
The run module with two options for plan and apply workflow:
-
-
Option1: Uses the
auto_applyparameter to handle both the plan and apply workflows:- name: Create a run with auto_apply hashicorp.terraform.run: workspace_id: ws-1234 run_message: "destroy vpc" state: "present" tf_token: "{{ tfc_token }}" auto_apply: true poll: true poll_interval: 10 poll_timeout: 30 -
Option 2: Uses two sub-steps to create a
save_planrun and then apply it.-
Create the plan:
- name: Create a save plan run hashicorp.terraform.run: workspace_id: ws-1234 run_message: "save plan vpc creation" state: "present" tf_token: "{{ tfc_token }}" poll: true poll_interval: 10 poll_timeout: 30 save_plan: true -
Apply the plan. You get the
run_idfrom the output of the run module task:- name: Apply the save plan run hashicorp.terraform.run: run_id: run-1234 state: "applied" tf_token: "{{ tfc_token }}" poll: true poll_interval: 10 poll_timeout: 30
-
3.2. Migrating from Terraform Community-Edition
If you want to use Ansible Automation Platform with Terraform Enterprise (TFE) or HCP Terraform and you are currently using Terraform Community-Edition (TCE), you must first migrate to TFE or HCP Terraform and then update Ansible Automation Platform configurations to work with TFE or HCP Terraform.
3.2.1. Migrating from the community edition
When you migrate from TCE to TFE or HCP Terraform, you are not migrating the collection itself. Instead, you are adapting your existing TCE usage to work with TFE or HCP Terraform. After you migrate, you must update the Ansible Automation Platform credentials, execution environment, and job templates.
|
Note
|
The |
-
Use the latest supported version of Terraform (1.11 or higher).
-
Follow the
tf-migrateCLI instructions under Additional resources below. -
Ensure that the HCP Terraform or TFE workspace is not set to automatically apply plans.
-
To prevent errors when running playbooks against TFE or HCP Terraform, do the following actions before running a playbook:
-
Confirm that the Terraform version in the execution environment is the same as the version stated in TFE or HCP Terraform.
-
Perform an initialization in TFE or HCP Terraform:
terraform init
-
If you have a local state file in your execution environment, delete the local state file.
-
Get a token from HCP Terraform or Terraform Enterprise, which you will use to create the credential in a later step. Ensure the token has the necessary permissions based on the team or user token to execute the desired capabilities in the playbook.
-
Remove the backend config and files from your playbook definition.
-
Add the workspace within the default setting in your TF config or an environment variable if you want to define the workspace outside updating the playbook itself.
NoteYou can add the workspace to your playbook to scale your workspace utilization.
-
-
From the Ansible Automation Platform user interface:
-
(Optional) After the migration is completed and verified, you can run the additional modules and plugins from the collection in your execution environment:
3.3. Migrating from community.hashi_vault
If you are using the community.hashi_vault collection, you can migrate your existing playbooks to the hashicorp.vault collection.
There are two modules for hashicorp.vault that you must configure:
-
hashicorp.vault.kv2_secret- A unified module for CRUD operations on KV2 secrets. -
hashicorp.vault.kv2_secret_get lookup- A lookup plugin for reading KV2 secrets.
In the following procedures, you will replicate the parameters from the community.hashi_vault modules to these required hashicorp.vault modules.
3.3.1. Configuring the hashicorp.vault.kv2_secret module
The hashicorp.vault.kv2_secret module performs Create, Update, and Delete (CRUD) operations on KV2 secrets through a unified interface.
The corresponding community.hashi_vault modules are:
-
community.hashi_vault.vault_kv2_write- Write KV2 secrets. -
community.hashi_vault.vault_kv2_delete- Delete KV2 secrets.
-
Install the Ansible Automation Platform certified
hashicorp.vaultcollection.
-
Replicate your automation tasks from both of the
community.hashi_vaultmodules to the followinghashicorp.vault.kv2_secretparameters. Thehashicorp.vault.kv2_secretparameters are similar tocommunity.hashi_vault. For examples, see Migration examples for thehashicorp.vault.kv2_secretmodule.auth_method: description: Authentication method to use type: str choices: [token, approle] default: token required: false cas: description: Perform a check-and-set operation. type: int required: false data: description: KV2 secret data to write. type: dict required: true engine_mount_point: description: The path where the secret backend is mounted. type: str default: secret required: false aliases: [secret_mount_path] namespace: description: Vault namespace where secrets reside. type: str default: admin aliases: [vault_namespace] path: description: Vault KVv2 path to be written to. type: str required: true aliases: [secret_path] url: description: URL of the Vault service type: str aliases: [vault_address] required: true versions: description: One or more versions of the secret to delete. type: list of int required: false state: description: Desired state of the secret type: str choices: [present, absent] default: present
-
You must add the
stateparameter to thehashicorp.vault.kv2_secretmodule, as shown above. Valid options are:-
present: This is the equivalent ofcreateorupdatein thecommunity.hashi_vault.vault_kv2modules. -
absent: This is the equivalent ofdelete secretin thecommunity.hashi_vault.vault_kv2modules.
-
3.3.2. Configuring the hashicorp.vault.kv2_secret_get lookup plugin
The hashicorp.vault.kv2_secret_get lookup plugin module reads KV2 secrets.
The corresponding community.hashi_vault modules are:
-
community.hashi_vault.hashi_vault: Retrieves secrets from HashiCorp Vault. -
community.hashi_vault.vault_kv2_getlookup: Gets secrets from the HashiCorp Vault KV version 2 secret store.
-
Replicate the
community.hashi_vaultmodules to the followinghashicorp.vault.kv2_secret_getparameters. For examples, see Migration examples for thehashicorp.vault.kv2_secret_getlookup plugin.auth_method: description: Authentication method to use type: str choices: [token, approle] default: token required: false mount_point: description: Vault mount point type: str required: false aliases: [secret_mount_path] namespace: description: Vault namespace where secrets reside. type: str default: admin aliases: [vault_namespace] secret: description: Vault path to the secret being requested in the format path[:field] type: str required: true aliases: [secret_path] url: description: URL of the Vault service type: str aliases: [vault_address] required: true version: description: Specifies the version to return. If not set the latest is returned. type: int required: false
-
Use the following guidance to configure the
hashicorp.vault.kv2_secret_getparameters:-
auth_method: Maps identically toauth_methodin thecommunity.hashi_vault.hashi_vaultmodules. -
mount_point: Maps tomount_pointin thecommunity.hashi_vault.hashi_vaultmodules. Alias:secret_mount_path. -
namespace: Maps tonamespacein thecommunity.hashi_vault.hashi_vaultmodules. Alias:vault_namespace. -
secret: Maps tosecretin thecommunity.hashi_vault.hashi_vaultmodules. -
url: Maps tourlin thecommunity.hashi_vault.hashi_vaultmodules. Uses the same aliases asvault_address. -
version: Maps identically toversionin thecommunity.hashi_vault.hashi_vaultmodules.
-
3.3.3. Migration examples for the hashicorp.vault.kv2_secret module
The following examples show basic before and after configurations for the hashicorp.vault.kv2_secret module.
Before (community.hashi_vault):
- name: Write/create a secret
  community.hashi_vault.vault_kv2_write:
    url: https://vault:8200
    path: hello
    data:
      foo: bar
After (hashicorp.vault):
- name: Write/create a secret
  hashicorp.vault.kv2_secret:
    url: https://vault:8200
    path: hello
    data:
      foo: bar
Before (community.hashi_vault):
- name: Delete the latest version of the secret/mysecret secret.
  community.hashi_vault.vault_kv2_delete:
    url: https://vault:8201
    path: secret/mysecret
After (hashicorp.vault):
- name: Delete the latest version of the secret/mysecret secret.
  hashicorp.vault.kv2_secret:
    url: https://vault:8201
    path: secret/mysecret
    state: absent
Before (community.hashi_vault):
- name: Delete versions 1 and 3 of the secret/mysecret secret.
  community.hashi_vault.vault_kv2_delete:
    url: https://vault:8201
    path: secret/mysecret
    versions: [1, 3]
After (hashicorp.vault):
- name: Delete versions 1 and 3 of the secret/mysecret secret.
  hashicorp.vault.kv2_secret:
    url: https://vault:8201
    path: secret/mysecret
    versions: [1, 3]
    state: absent
3.3.4. Migration examples for the hashicorp.vault.kv2_secret_get lookup
These before and after examples help users understand how the module can be configured in a real world environment.
Before (community.hashi_vault)
- name: Return latest KV v2 secret from path
  ansible.builtin.debug:
    msg: "{{ lookup('community.hashi_vault.hashi_vault', 'secret=secret/data/hello
  token=my_vault_token
  url=http://myvault_url:8200') }}"
After (hashicorp.vault)
name: Return latest KV v2 secret from path
  ansible.builtin.debug:
    msg: "{{ lookup('hashicorp.vault.kv2_secret_get', 'secret=secret/data/hello
  url=http://myvault_url:8200') }}"
4. Integrating from Terraform
If you have already provisioned your environment from Terraform Enterprise, you can use the Terraform official provider for Ansible Automation Platform to leverage Ansible Automation Platform automation capabilities for Day 2 tasks and manage infrastructure updates and lifecycle events. For more information about integrating from Terraform Enterprise, see the Terraform documentation and the Ansible Automation Platform official provider in the Terraform registry.